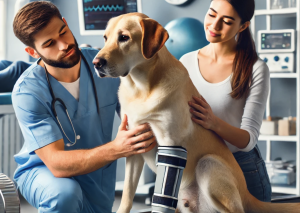
When your dog shows signs of lameness, stiffness, or discomfort, a thorough orthopaedic examination by a veterinarian or Veterinary Physiotherapist such as ourselves is essential to pinpoint the underlying cause. This process is a detailed assessment of your dog’s musculoskeletal system, including bones, joints, muscles, tendons, and ligaments. Here’s what you can expect during a typical orthopaedic examination and why each step is important for your pet’s health.
Step 1: Observing the Gait
The examination often begins with a simple yet vital step—watching your dog walk. The veterinarian will observe your dog’s gait from the front, back, and sides, checking for symmetry in movement and signs of discomfort. Any irregularities, such as a limp or stiffness, can provide clues to where the issue may lie.
From the side, the veterinarian assesses how well the limbs move, focusing on the elbows, stifles (knees), carpi (wrists), hocks (ankles), shoulders, and hips. These should all move symmetrically and smoothly. For a more comprehensive analysis, the vet may observe your dog at different speeds, such as a trot or run, which can help highlight subtle asymmetries that may be missed at a walking pace.
Step 2: Front and Rear Limb Assessment
When viewed from the front, the dog’s head should remain level, with no head bobbing, and the limbs should be evenly spaced. Head nodding, especially during the stance phase, can indicate forelimb lameness, where the dog tries to shift weight off the affected limb.
From behind, the hips and hocks are evaluated. Ideally, they should be at the same level, and the limbs should move symmetrically. A common issue in dogs with hind limb lameness is uneven weight-bearing, as seen in conditions like cruciate ligament disease, where the affected limb does not sink to the ground as much as the healthy one.
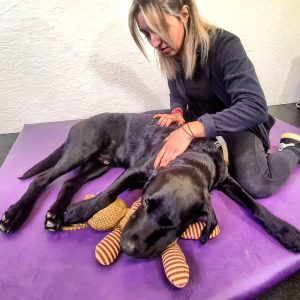
Step 3: Physical Examination of the Limbs and Spine
After observing the dog’s gait, the physical examination begins. The veterinarian palpates (feels) the dog’s trunk and limbs, looking for signs of muscle atrophy, joint swelling, or fibrosis (thickening of connective tissue). This step is crucial for identifying conditions like arthritis or muscle loss due to disuse or nerve damage.
The spine is also thoroughly checked. Applying pressure along the vertebrae helps identify spinal pain, which is particularly important for dogs with hind limb lameness. The neck is manipulated to detect any stiffness or discomfort, especially in cases of forelimb lameness that may originate from the cervical spine.
Step 4: Detailed Limb Examination
A thorough orthopaedic examination involves systematically checking each limb from the toes up to the joints. The toes are inspected for corns or other painful conditions, and the veterinarian checks for proper movement in the digits (toes), looking for signs of instability or discomfort. The carpal (wrist) and tarsal (ankle) joints are carefully assessed for swelling, pain, and range of motion.
The elbow, for instance, should flex comfortably so the paw can touch the shoulder, and both internal and external rotation should be painless. The stifle (knee) and hock (ankle) are similarly checked for flexibility and discomfort. The veterinarian also performs specific tests, such as the tibial thrust test, to detect injuries like cranial cruciate ligament ruptures, a common cause of hind limb lameness in dogs.
Step 5: Checking for Joint Effusion and Ligament Damage
The examination includes feeling for joint effusion (fluid buildup) in areas like the elbow, hock, and stifle. These areas are particularly prone to arthritis and ligament injuries. The veterinarian palpates around the joint to detect swelling or abnormal movement, which may indicate ligament damage or joint instability.
In dogs with suspected cruciate ligament issues, a tibial thrust test is performed. This test helps detect whether the cranial cruciate ligament is torn by observing the movement of the tibia (shin bone) during hock flexion. Unlike the cranial drawer test, which often requires sedation, the tibial thrust test can be done while the dog is awake, making it a useful diagnostic tool.
Step 6: Examining the Hips
Hip health is a major concern in many dogs, especially larger breeds prone to conditions like hip dysplasia. The veterinarian flexes, extends, and rotates the hips to check for pain or abnormal movement. In some cases, palpating specific landmarks like the wings of the ilium, the greater trochanter, and the ischial tuberosities helps assess whether the hips are symmetrical.
Step 7: Special Tests for Joint Stability and Muscle Atrophy
In addition to flexion and extension tests, the veterinarian will assess the dog’s muscle condition, particularly around the scapula and upper limbs. Muscle atrophy can be a sign of nerve damage or disuse due to pain. Prominent muscle wasting may indicate a neurogenic cause, whereas milder atrophy usually results from decreased activity due to discomfort.
For shoulder issues, the vet performs a biceps test to evaluate the integrity of the biceps tendon, which can cause pain in dogs with bicipital tenosynovitis. The shoulder is also abducted and adducted, with pressure applied to the scapula to detect joint instability.
Step 8: The Sitting Test
Finally, the vet may assess how your dog sits. Dogs with stifle (knee) problems, such as cruciate ligament injuries, often avoid fully flexing their stifles and may sit with their legs extended to the side. This is a telltale sign that flexing the stifle causes discomfort.
Conclusion
An orthopaedic examination is a thorough and methodical process that helps veterinarians identify the root causes of your dog’s discomfort or lameness. By assessing gait, palpating muscles and joints, and performing specific diagnostic tests, vets can pinpoint issues like arthritis, ligament injuries, or muscle atrophy. If your dog is experiencing any signs of lameness or stiffness, don’t hesitate to consult your veterinarian. Early detection and treatment are key to keeping your dog happy, healthy, and active.
Here’s a handy video from our friends at The Moores Orthopaedic Clinic covering the process of an Orthopaedic Examination: